
Energy decides how far you get in Lumi Master. Every step on the exploration path costs it, every catch and reward roll runs on it, and the game hands it out in small, scattered amounts that are easy to miss. The beginner tips cover the two big habits: bank Energy for a high compass multiplier, and stay under the regeneration cap. This guide is the layer underneath. It gives the daily routine with real amounts, in the order worth doing it, the one-off sources that pay the most, and the mistakes that quietly cost players thousands of Energy in their first weeks.
1. The daily routine, in order
Run through these every day, roughly in this order. The first two are the biggest reliable daily sources a free player has, and neither takes more than a minute.
Stellarizing is the one to build your day around. Five purple Water Lumi stellarized at your home pay 400 Energy, the single biggest daily source on this list. That changes how you should treat catches: a purple Water Lumi is no longer a spare to release, it is part of tomorrow's Energy. Keep a small stock of them so you never miss a day. On top of that, Stellarization's own daily reward is 100 Energy, so skipping a day costs more than the Lumi you didn't send.
The fountain in Explorer Plaza pays up to 100 a day, but only at set times, and you have to be standing near it while it runs. If you play in short sessions, learn when it is active and log in around then.
The order board is the trap in this routine. Its daily rewards are worth claiming up to 30 submissions. Past that, every order you fill spends crafting materials you will want later for rewards that do not repay them, so stop at 30 and leave the rest. The 24 September update raised the Energy and Cans that Home Orders pay, so those first 30 are worth more than they were at launch.
| Source | Energy | When | Tip |
|---|---|---|---|
| Stellarize 5 purple Water Lumi at home | 400 | Daily | Keep purple Water catches for this |
| Explorer Plaza fountain | Up to 100 | At set times | Stand near it while it is active |
| Gym battles | Grows with your badges | Daily | Push to the newest dungeon first |
| Order board | Varies | Daily | Stop at 30 submissions |
| Tasks, mail, codes, Gallery | Varies | Daily | See the beginner tips, section 2 |
2. Gyms: the biggest one-off pile
Clearing every gym on every difficulty pays 3,600 Energy in total. That is nine days of stellarizing in a single push, and it is open to you early. When you are short on Energy, gyms are the first place to look, ahead of every other mode.
Gyms also pay a daily reward, and that reward grows with the number of badges you hold. So the order matters: push gym progress to the newest dungeon you can clear before anything else, because each new badge raises the daily payout for the rest of the season. Two extra gyms cleared in your first week keep paying every day after that.
Use Quick Battle only when your squad clearly outclasses the gym. Close fights are worth playing by hand, since a lost attempt costs you time and the next try.
3. Encounters on the path
Random and gamble encounters on the exploration path offer a choice of reward. Take the Energy option. Items and coins feel better in the moment, but Energy is what keeps you exploring, and the path is where most of your catches and rewards come from. A few Energy saved at each encounter adds up to extra steps at your next high multiplier.
One encounter is worth avoiding outright: Toutou. Running into it costs you 100 Energy and 56 gold, a straight loss with nothing in return. If the path gives you a way around it, take it.
The luck stalls are the opposite case. You wager Energy and get between ×1 and ×2 back, so you cannot lose, and every stall you pass is worth using.
4. Where to spend it
Finish the main quest line first; it is the road to player level 50, which opens the Season 1 map. Once that map is open, Season 1 content comes first. The Season 1 map and its time-limited Lumi disappear when the season ends, while the permanent main stages will still be there next month. Every Energy spent on a permanent stage during the season is Energy not spent on something that expires.
Within Season 1, spend in big chunks at a high compass multiplier. The multiplier raises every reward roll and lets you catch several Lumi at once, so the same Energy goes much further at ×50 than at ×1. The beginner tips explain the multiplier tiers. The short version: bank Energy and spend it when a high multiplier is up.
The one exception to banking is the regeneration cap. Natural regeneration stops while you sit above your Energy cap, so if you are waiting on regeneration rather than rewards, spend back under the cap before you log off. Sitting at the cap overnight throws away a night of free Energy.
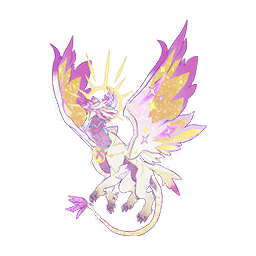 PteroluxDivine / Dragon
The Season 1 Starcolor gallery reward, one more reason Season 1 comes first.
5. Five ways to waste Energy
Trading a Lumi away before evolving it. The Starlit Tree pays Energy for Lumi you give up, but evolving can register a higher rarity in the Gallery first, and Gallery milestones pay Energy too. Evolve, check the Gallery, then trade.
Releasing or selling before you need the shards. Released Lumi give shards for ascension and stellarizing. Released early, those shards sit unused while the Lumi could still have been evolved, registered or stellarized. Release only when a specific ascension or stellarize is waiting on the shards.
Buying Cake Festival coin packs. They are poor value, and the same money buys more from the top-up shop or as Energy directly.
Pulling on the Apex Treasury during the Stellarization event. Its rates and rewards are poor, and every resource spent there is one not spent on Energy or catches. Skip it.
Filling orders past 30 a day. Beyond that point the board eats crafting materials for rewards that are not worth them.
 Evolution FruitSpecial & Event Items
Evolve before trading, so the Gallery logs the higher form.
6. Free players: collect from every mode
A free player cannot lean on paid refills, so every free source has to be collected. The other battle modes and Guild Wars pay daily Energy as well, and skipping them costs a lot over a season. Join an active guild early so Guild Wars rewards start flowing from the first week.
Events are the hard part. Refills are scarce, and some event milestones have requirements the game does not show up front, several of them paid. Plan to finish the free tiers of each event, spend nothing you would regret, and let the rest go rather than burning your daily Energy chasing a reward you cannot reach.
If you only have ten minutes a day, spend them in this order: stellarize, claim the fountain if it is running, clear a gym, then log off under the cap.