
Lumi Master's events are generous if you play them properly and punishing if you don't. Refills are scarce, some milestone requirements only show up once you are deep into an event, and the paid offers are placed exactly where a frustrated player will tap them. This guide starts with Season 2, which opened on 25 September with the Frostridge Plains map, Lumi Pinball and a new Stellarization Challenge, then covers the launch-period events: the Cake Festival, the lucky race, and the TOMATO collaboration pass. The Peach Cat collab that started the same day has its own guide. For each one it says what is worth chasing, the order to do things in, and the mistakes that cost players the rewards they were playing for.
1. Season 2: Frostridge Plains and Sandlord - Variant
Frostridge Plains replaced the Season 1 map on 25 September, alongside the Peach Cat collab and a round of pass events. The map is worth visiting and not worth draining. Spend enough Energy to catch its purple Lumi for the Gallery, and keep the rest for the collab and Pinball. A season map guarantees a rainbow Lumi after 499 catches, so steady exploration across the season earns one without chasing it.
The season's Stellarization Challenge gives Sandlord - Variant. It keeps Sandlord's stage-passing job: its signature raises whichever of its ATK or DEF stage is lower by 2, and Parting Gift hands every stage to the Lumi that comes in when it switches out by choice. Where the two are equal the Variant raises ATK, so it suits a team that passes stages to an attacker. At 85 HP it can't sit through many hits while it builds, and a forced swap passes nothing on. It is A on our tier list alongside Sandlord, so take it: stage passing wins games on the ladder.
 Sandlord - VariantGround Special: Variant
The Stellarization Challenge reward. Leans its stages toward ATK.
2. Destiny Lumi: choose your own Rainbow
The Destiny Lumi lets you pick a Rainbow instead of waiting for one to spawn. It unlocks once you have caught 15 Rainbow Lumi on the main map and 8 Rainbow Lumi from the season. You then choose one of eight Lumi as your Destiny, and after three more Rainbow catches on the map, the next Rainbow you meet is the one you chose.
It gets no extra stats or perks, so it is no stronger than the same Lumi caught the normal way. Its value is certainty. Spend the pick on a Rainbow you would otherwise buy on the market, or one you released early and now need, such as a Bloom for a Leech team.
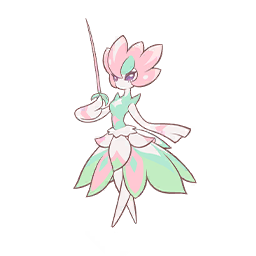 BloomGrass Battle
A good Destiny pick if you released yours early.
3. Lumi Pinball
Lumi Pinball is a four-day solo event with five phases, and each phase rewards 5,000 Energy and 100 Magic Wands, so it feeds both your exploration and the Peach Cat collab shop. Bumpers add extra stars to each drop, and the far left and right bumpers are the ones to aim at. You can launch again straight away instead of waiting for a ball to settle, which saves a lot of time over four days.
The 5,000 Energy reward sits at 600,000 points. Check your score against that line before you spend more time chasing the next one.
Free players won't clear every phase, and shouldn't try to. Take the free Energy each phase gives, and don't count on the last phases when you plan your week. The same goes for the weekly tournament running beside it: if you are a few wins short of the 15-win reward, tournament tickets from the item shop let you play the extra matches.
 Tournament TicketCurrency & Tickets
From the item shop, for the last few of the 15 weekly wins.
4. The weekly tournament and the fishing event
The weekly tournament puts everyone on the same footing. Every Lumi is set to level 50 with 5 ascensions and star-up effects are switched off, so what you have invested matters less there than which three Lumi you bring. That makes it the best place to try a team before you spend materials on it.
Fifteen wins in a week earns a Starcolor Lumi of your choice, which is the reward to play for. Spread the matches across the week instead of leaving them to the last evening.
Losses are limited. Once yours run out for the week, extra entry tickets are sold in the shop for 100,000 gold each, which is worth it when you are a few wins short of 15. Since the 19 October update the tournament keeps its own saved team, apart from the Ladder, Gyms and the Championship, so editing one no longer breaks another, and every battle now runs on a timer.
Higher up, opponents ban Lumi before the match. Bring a team they will want to ban, such as a Charigon bounce team, beside the one you actually plan to win with, so the ban lands on the decoy.
The fishing event rewards a staffed fishery. Pan Pan Goma's Patience trait makes aquafarming 40% faster while it is stationed there, so catch one on Sweet Beach before the collab ends.
 Pan Pan GomaGrass Worker
Patience: aquafarming is 40% faster at the fishery.
5. Cake Festival: work it with your partners
The Cake Festival puts you in a group with four partners, and the event is built so that the group finishes cakes together. The efficient way to play it is to split your contributions evenly: put half of your effort into your own cake and half into your partners'. Players who pour everything into their own plate finish it, then sit waiting while the group's shared progress stalls.
The order matters. Complete your own cake plate first, then spend your spins helping your partners with theirs. Once your plate is done, every spin you hand over pushes the group toward rewards that you also receive, so there is no reason to stop playing after your own cake is finished.
If the festival screen glitches when you open it, force close the game and restart it; that clears the problem, so there is no need to wait it out or contact support.
6. The phase rewards worth chasing
The festival runs in phases, and two of its rewards are worth planning your Energy around. Phase 1 hands out Prism Mirrors. Ten of them awaken a Rainbow Lumi you already own into Starcolor, and a single mirror re-rolls the colour of one you already have. That makes phase 1 the cheapest route to a Starcolor Lumi for a free player, and the mirrors keep their value after the event ends.
Phase 2 gives a free Greenwood Rainbow egg for finishing it. A guaranteed Rainbow is rare enough that this alone justifies pushing through the second phase, even if the rest of its rewards look ordinary. Hatch it rather than letting it sit: hatched Lumi count in the Gallery, where a bought one would not.
If you have to choose where your limited festival Energy goes, finish phase 2 for the egg and collect as many phase 1 mirrors as you can along the way. Everything else in the festival is a bonus.
 Prism MirrorCrafting & Ascension Materials
Ten awaken a Rainbow's Starcolor. The phase 1 reward to collect.
7. Cakes, coins and the roulette
The cakes you pick up while exploring during the festival double as the currency for the four-day team roulette that follows, so save them rather than spending them the moment you have a few. Arriving at the roulette with a full stock is worth far more than trickling cakes out beforehand.
Skip the Cake Festival coin packs. They are poor value for money, and anything you would spend on them buys more from the top-up shop or as Energy directly. The free route gets you the rewards that matter if you follow the order above, and the packs add little on top of it.
Watch the milestones closely. Some event milestones carry requirements that the game does not show until you are close to them, and a few of those lean on paid items. Read the full milestone list at the start of an event so you know which rewards are realistic, and don't spend Energy chasing one you cannot finish.
8. The lucky race
The lucky race scores you in clover points, and those points are multiplied by your compass multiplier from exploration. That is the single most important fact about it. Clover points earned at ×1 are a fraction of the same points earned at a high multiplier, so bank your Energy and run the race's exploration at the highest multiplier you can reach.
Signboards on the path offer choices, and pranks and duels are the ones that pay clover points. Pick one of those every time a signboard comes up rather than taking an item. Combined with a high multiplier, those signboard choices are where most of a good score comes from.
Because the race rewards the same banking habit as the rest of exploration, it pairs well with the Energy routine: save during the quiet days, then spend in one long session at a high multiplier while the race is running.
9. The TOMATO pass: LIL, TEEN and OLD TOMATO
The TOMATO collaboration pass gives you the TOMATO family, and their appeal is flexibility. LIL TOMATO, TEEN TOMATO and OLD TOMATO can each switch the element of their swappable skill, which lets one Lumi cover whatever element your team is missing and hit enemies super effectively. Switching costs 1,000 gold each time, so pick the element your team lacks and leave it there rather than swapping for every fight.
LIL TOMATO and TEEN TOMATO evolve with Bilibili Coins, which come from the pass. Push the pass far enough to collect the coins before it ends; a TOMATO left unevolved when the pass closes is stuck at its weakest form. OLD TOMATO at the end of the line has the strongest signature of the three, draining up to 8 SP for a string of hits, so it is the form worth aiming for.
Treat the TOMATO family as a useful gap-filler rather than a core pick. Their signatures only hit hard with a full SP bar, and permanent Lumi such as Floragon do more in the Arena.
 Bilibili CoinCurrency & Tickets
Evolves LIL and TEEN TOMATO. Collect them from the pass before it ends.
 OLD TOMATOGrass
The end of the line, and the form worth aiming for.
10. MEGA TOMATO
MEGA TOMATO is the pass's standout, and it plays nothing like the rest of its family. It enters in Stealth, and until an enemy skill connects, its crits deal 350% damage. A shield stops an enemy skill from breaking that Stealth, so pair it with the Shield trainer skill and it keeps the window open for longer.
Raising it has two catches. MEGA TOMATO uses its own Keepsakes and Starcores, not the LIL TOMATO materials, so budget for it separately. Its swappable skill also costs 1,000 gold to change element, like the rest of the family, so decide on Electric Orb or another element once and stick with it.
Personality is worth setting. A Crystal Orb re-rolls a Lumi's personality, and Playful, which trades 10% Work for 10% more attack, suits MEGA TOMATO because it is a fighter, not a worker. Spend the orb on it only once you have decided MEGA TOMATO is staying in your team.
 MEGA TOMATODark
Stealth crits at 350% until an enemy skill lands. Pair it with Shield.
 Crystal OrbCrafting & Ascension Materials
Re-rolls personality. Playful suits MEGA TOMATO.
11. Event rules for free players
Read the whole reward list on day one, and pick the two or three rewards you actually want. Bank Energy before an event starts rather than during it. Finish free tiers in order, spend nothing on coin packs, and walk away from any milestone that turns out to need a purchase. Most of the value in these events sits in a few rewards: Prism Mirrors, a Rainbow egg and the pass's Bilibili Coins. Get those and the event has paid off.